


In SwiftUI we can make our Apps more interactive by adding different interactions that respond on our taps, clicks, and swipes.
Today we will review SwiftUI Basic Gestures:
TapGesture
Tap gestures allow us to recognise one or more taps on View.
We have several options how we can add a tap gesture.
First one is by using .onTapGesture modifier directly.
Circle()
  .onTapGesture {
    // Respond to Tap Gesture
  }
And other option that is being used in SwiftUI documentation is by creating and configuring a gesture as a property and then use it with .gesture(_:including:) modifier.
But remember that in order to do something or respond to a tap we need to use .onEnded action closure that is triggered when the gesture ends.
struct SingleTapGestureView: View {
  var singleTap: some Gesture {
      TapGesture()
          .onEnded { _ in
              // Respond to Tap Gesture
          }
  }

  var body: some View {
      Circle()
          .gesture(singleTap)
  }
}
Actually second approach I like better as in such way we can create different gestures and re-use them through our code.
So if we put together code we can start making something like this.
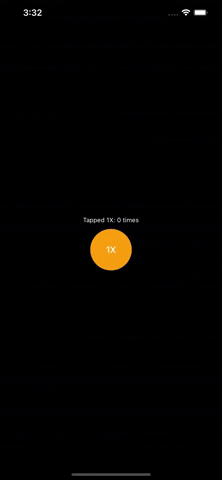
struct TapGestureView: View {
    @State private var isAnimating = false
    @State private var tapped1x = 0

    var singleTap: some Gesture {
        TapGesture()
            .onEnded { _ in
                tapped1x += 1

                withAnimation(Animation.easeOut(duration: 0.5)) {
                    self.isAnimating = true
                }

                DispatchQueue.main.asyncAfter(deadline: .now() + 0.5) {
                    self.isAnimating = false
                }
            }
    }

    var body: some View {
        VStack {
            Text("Tapped 1X: \(tapped1x) times")
                .font(.caption)

            Circle()
                .frame(width: 80, height: 80)
                .foregroundColor(.orange)
                .overlay(
                    Text("1X")
                        .fontWeight(.medium)
                )
                .background(
                    Circle()
                        .strokeBorder(Color.blue, lineWidth: 3)
                        .scaleEffect(isAnimating ? 1.5 : 1)
                        .opacity(isAnimating ? 0 : 1)
                )
                .gesture(singleTap)
        }
    }
}
Similarly we can control on how many taps we want to respond by just using TapGesture(count: Int) initializer.
In this case case you need to tap 3 times in order to trigger .onEnded action closure.
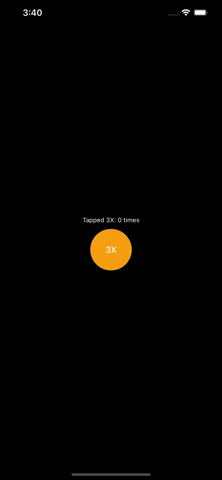
struct TapGesture3xView: View {
    @State private var isAnimating = false
    @State private var tapped3x = 0

    var multipleTap: some Gesture {
        TapGesture(count: 3)
            .onEnded { _ in
                tapped3x += 1

                withAnimation(Animation.easeOut(duration: 0.5)) {
                    self.isAnimating = true
                }

                DispatchQueue.main.asyncAfter(deadline: .now() + 0.5) {
                    self.isAnimating = false
                }
            }
    }

    var body: some View {
        VStack {
            Text("Tapped 3X: \(tapped3x) times")
                .font(.caption)

            Circle()
                .frame(width: 80, height: 80)
                .foregroundColor(.orange)
                .overlay(
                    Text("3X")
                        .fontWeight(.medium)
                )
                .background(
                    Circle()
                        .strokeBorder(Color.blue, lineWidth: 3)
                        .scaleEffect(isAnimating ? 1.5 : 1)
                        .opacity(isAnimating ? 0 : 1)
                )
                .gesture(multipleTap)
        }
    }
}
LongGesture
Long Press Gesture allows us to perform action after user has long-pressed our defined time and during the time while user is long-pressing.
We can set a minimum duration that must be met in order to recognise our long-press gesture. It can be set in LongPressGesture initialiser.
LongPressGesture(minimumDuration: 2)
Then we can use .updating method to perform action during the long-press and .onEnded to perform action when our gesture is recognised.
In this example I'm updating Circle() size and color during the long-press action, and when gesture is recognised I'm showing Text done.
Additionally I'm here using a GestureState property wrapper that is set to true during the long-press and it's set to false when the gesture ends. I'm using this property wrapper for sample animations.
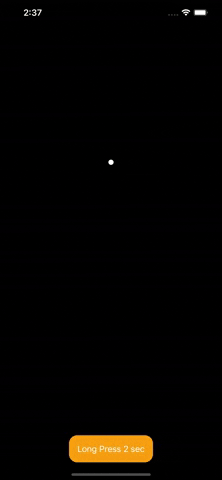
struct LongPressGestureView: View {
    @GestureState private var isLongPressDetected = false
    @State private var isDone = false

    var longPress: some Gesture {
        LongPressGesture(minimumDuration: 2)
            .updating($isLongPressDetected) { currentState, gestureState, transaction in
                DispatchQueue.main.async {
                    isDone = false
                }
                gestureState = currentState
                transaction.animation = Animation.easeIn(duration: 2)
            }
            .onEnded { done in
                isDone = done
            }
    }

    var body: some View {
        VStack {
            Spacer()

            Circle()
                .frame(width: 10, height: 10)
                .foregroundColor(isLongPressDetected ? .orange : .primary)
                .scaleEffect(CGSize(
                                width: isLongPressDetected ? 10 : 1,
                                height: isLongPressDetected ? 10 : 1))

            Spacer()
            if isLongPressDetected {
                Text("Updating...")
            }

            if isDone {
                Text("Done")
            }

            Spacer()

            Text("Long Press 2 sec")
                .padding()
                .background(isLongPressDetected ? Color.green : Color.orange)
                .cornerRadius(16)
                .gesture(longPress)
        }
    }
}
DragGesture
Drag Gesture allows us to perform an action when View is dragged.
We can take advantage and use .onChanged and .onEnded closure methods to perform some action. Both of those methods provide us great attribute DragGesture.Value that stores the following drag action information:
- location
- predictedEndLocation
- predictedEndTranslation
- startLocation
- time
- translation
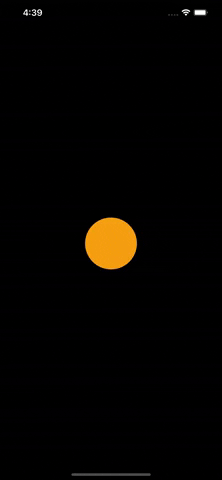
We can use this attribute to create movable Views. In current example I'm using .onChanged method to update Circle() location coordinates.
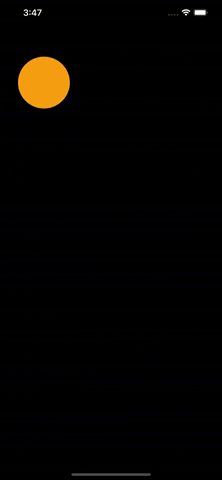
struct DragGestureView: View {
    @State private var location: CGPoint = CGPoint(x: 100, y: 100)

    var drag: some Gesture {
        DragGesture(minimumDistance: 1, coordinateSpace: .local)
            .onChanged { value in
                location = value.location
            }
    }

    var body: some View {
        Circle()
            .frame(width: 100, height: 100)
            .foregroundColor(.orange)
            .position(location)
            .gesture(drag)
    }
}
And here I've added .onEnded method to reset Circle() location coordinates when drag has ended.
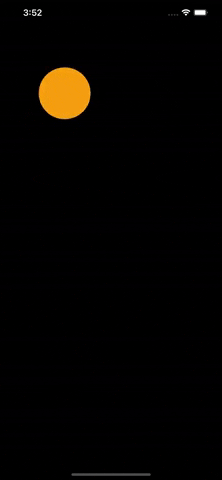
struct DragGestureView: View {
    @State private var location: CGPoint = CGPoint(x: 100, y: 100)

    var drag: some Gesture {
        DragGesture(minimumDistance: 1, coordinateSpace: .local)
            .onChanged { value in
                location = value.location
            }
            .onEnded { value in
                withAnimation(.easeOut) {
                    location = CGPoint(x: 100, y: 100)
                }
            }
    }

    var body: some View {
        Circle()
            .frame(width: 100, height: 100)
            .foregroundColor(.orange)
            .position(location)
            .gesture(drag)
    }
}
MagnificationGesture
Magnification gesture allows to respond with some action when we are applying a magnification motion on View.
Here we also have .onChanged, and .onEnded closures that we can use in order to respond during magnification action or when it's ended. As an attribute we receive MagnificationGesture.Value that is CGFloat. We can use this to change View size as an example.
struct MagnificationGestureView: View {
    @State var magnifiedValue: CGFloat = 1.0

    var magnification: some Gesture {
        MagnificationGesture()
            .onChanged { value in
                magnifiedValue = value
            }
            .onEnded { value in
                magnifiedValue = 1.0
            }
    }

    var body: some View {
        Circle()
            .frame(width: 100 * magnifiedValue, height: 100 * magnifiedValue)
            .foregroundColor(.orange)
            .gesture(magnification)
            .animation(.easeOut)
    }
}
RotationGesture
Rotation gesture allows to rotate View and respond with some action during rotation and when rotation has ended.
It also provides us with .onChanged, and .onEnded closures that gives us RotationGesture.Value that represents gestures Angle value. We can use this value to rotate View.
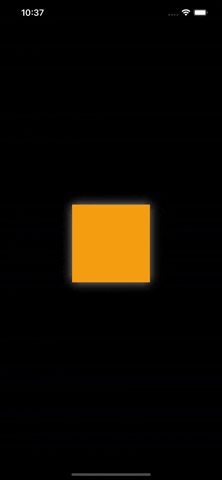
struct RotationGestureView: View {
    @State private var angle = Angle(degrees: 0.0)
    @State private var backgroundAngle = Angle(degrees: 0.0)

    var rotation: some Gesture {
        RotationGesture()
            .onChanged { angle in
                self.angle = angle
            }
            .onEnded { angle in
                withAnimation(Animation.spring()) {
                    self.backgroundAngle = angle
                }
            }
    }

    var body: some View {
        Rectangle()
            .frame(width: 150, height: 150, alignment: .center)
            .foregroundColor(.orange)
            .rotationEffect(self.angle)
            .gesture(rotation)
            .background(
                Rectangle()
                    .shadow(color: .primary, radius: 10, x: 0.0, y: 0.01)
                    .foregroundColor(.secondary)
                    .rotationEffect(backgroundAngle)
            )
    }
}
Final thoughts
This was only review of the basic Gestures that SwiftUI gives us. And we can do a lot with them to make our apps live. For more advanced use gestures can be combined or used simultaneously to make response or we can make our own custom gestures.